Since I’m just starting this blog I’m going to make the assumption that you also just got your camera, so today I’m going to cover some tips and tricks for setting up and using your camera that I’ve noticed new photographers tend to overlook.
Focusing the Viewfinder
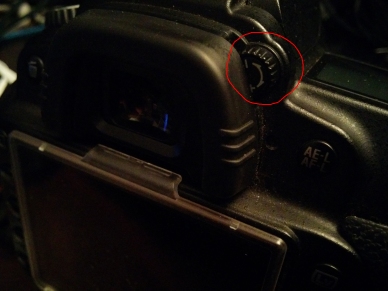
One of the first things you should do with a new camera is make sure the viewfinder is properly focused for your eyes. This is especially important if you’re like me and have fairly poor eyesight and ensures that what you’re seeing when composing your shot is also what your camera is seeing. The focus adjustment is called the diopter and is generally located right next to the viewfinder as shown on my camera (Nikon D90) in the picture above. One of the easiest ways to make sure the diopter on an optical viewfinder is properly focused is to turn the camera off, remove the lens, then point the camera at a point of light and adjust the diopter in the + or – direction until your auto-focus points are as sharp as possible. For those of you with an electronic viewfinder this article from B&H photo has a great description.
Your Copyright Information

Something that you may not have thought of but could be very important in the future is the intellectual property that is your photography. All modern cameras produce what is known as exif data, which is extra data stored in the image about the image such as type of camera, lens, aperture setting, shutter speed, etc. One of the things you can have your camera add to this data is your copyright information. Having your information embedded in the exif data makes it more difficult for someone to take your image and use it as their own. Some cameras have a full Copyright section where you can fill out the artist’s name and copyright, on others you can use the user comment field to fill out your copyright information. If your camera does not support the copyright symbol © you can just use (c). On most cameras this is configured directly in the setup menu, but check your manual for specific instructions.
Choosing Your Image Quality
Many cameras give you the option to save images as RAW and/or JPEG files. RAW files are somewhat analogous to negatives in traditional film cameras and contain the raw information from your image sensor. The big advantage here is that you have the best overall image quality and a wider range of options if you’re going do any serious editing, but most programs and website don’t know what to do with a raw file so you must use a program which can decode the file. The downside of course is that RAW files are very large. Each camera will produce a slightly different file size depending on the sensor in the camera but a raw image can take around 2-6 times as much space as a JPEG. JPEGs, as I’ve already mentioned, don’t take up nearly as much space as a raw file. This is because they are compressed using a lossy method, causing a loss in image quality. They are also more difficult to edit but are much easier to share online or with friends and family. The method I prefer, is to have my camera store RAW and JPEG images at the same time, this allows me to easily edit images that I feel would be good art, but also allows me the flexibility to share images online with little effort when I just want to show friends and family what I’ve been up to.
Viewfinder Grid
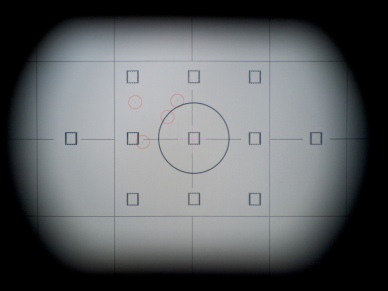
Many cameras have the ability to display a grid over the viewfinder. While this is more about personal preference, I find having the grid invaluable as it allows for easily checking that a picture is level with something in the frame. This can save a lot of time in post where you might have to re-level the photo. If your camera has an electronic grid it can generally be turned on through the camera’s menu. On my camera this is found in the custom settings menu under auto-focus, but check your manual for specific instructions.
In later posts I’ll be covering more complex topics such as the exposure triangle (ISO, Aperture, and Shutter Speed), various exposure modes, White Balance, Composition, etc. I plan to have a new post available about every two weeks, with a few scattered in-between if I have other things I want to share.
Peter

So happy!!!! I just got a Nikon D3300 DSLR and have been having fun learning but reading your posts makes it seem so much easier to learn! Thank you for sharing!
LikeLike
Awesome! ,Thank to for reading, and I’m glad I could help. Feel free to reach out if you have any specific questions.
LikeLike
I never knew about setting the copyright information. We will have to look into doing that on our camera. Thanks for sharing.
LikeLike
Glad I could help. Feel free to reach out if you have any questions I haven’t answered on the blog yet.
LikeLike
Thanks. I have just got a Nikon D5300 and am now driving family and friends mad. Every scrap of info is precious. Great info
LikeLike
I’m glad I could help. Feel free to ping me if you have any specific questions.
LikeLiked by 1 person
Thanks. Great shots by the way 🙂
LikeLike
Thanks
LikeLike
Pingback: White balance | petersouthlandphotography
Reblogged this on Julie Powell – Graphic Artist and commented:
If there is anyone else out there just starting to play with their first SLR or even if they are just getting back into after a VERY long time (and can’t really remember it all) this blog is great……….really recomend it
LikeLike
Reblogged this on petersouthlandphotography and commented:
Just want to say a big congratulations to anyone in possession of a new camera today. Make sure you check out my Learning Photography Posts, so you can start taking awesome photos.
LikeLike
I got my first DSR camera last year and a new lens and camera this year. Never had a class and trying to learn on my own, so looking forward to following along with your lessons! 🙂
LikeLike
awesome!! Hope I can help.
LikeLike
Thank you for all of the great information. I have been a Pentax K10D DSLR user for many years, but have just up-graded to a Nikon D7000. The difference in these two cameras are amazing. Nikon is much better in my opinion. Pentax is nice, also, but not as good. I have become a Nikon user now, but will keep the Pentax for a back-up. Regards to you.
LikeLike
I am a self-taught photo taker and have had a digital camera for over ten years – and I never knew about focusing the viewfinder or the copyright info! Thank you for sharing and for liking our blog post which led me to your site!
LikeLike
Glad I could help. 🙂
LikeLiked by 1 person