Today we’re going to be covering the various metering modes. Metering is short for light metering. Modern cameras have built in light meters, these meters, along with some fancy algorithms allow cameras to set aperture, ISO, or shutter speed for a proper exposure. Since each manufacturer has come up with different marketing terms for basically the same mode, I will try to make note of each, then for consistency refer to them in the Nikon fashion later in the post.
Metering is used in every mode except full manual. When you set the metering mode you’re changing which part or parts of the image will be measured for light intensity. There are three basics types of metering, matrix(Nikon) / evaluative (Canon), center weighted, and spot (Nikon) / partial (Canon). Some cameras also have an average mode available, but this is not standard. You can generally change metering modes on the fly by holding down your metering button and turning one of the mode dials, but check your manual for specific instructions.
Matrix / Evaluative / Multizone Metering
Matrix, Evaluative, or Multizone metering is the default mode on most cameras. It works by sampling the light levels over several parts of the image and combines the results to find the best exposure level.
This mode works very well when the scene you’re shooting is evenly made up of light and dark elements. However it can fail when an element of the image is particularly light or dark when compared to the rest of the scene. Common elements that confuse this type of metering are windows in the background, all black or all white pets, shady areas on a sunny day, etc. All that being said, this is the mode I would recommend for everyday use. When it doesn’t do what you want try switching to one of the other modes.
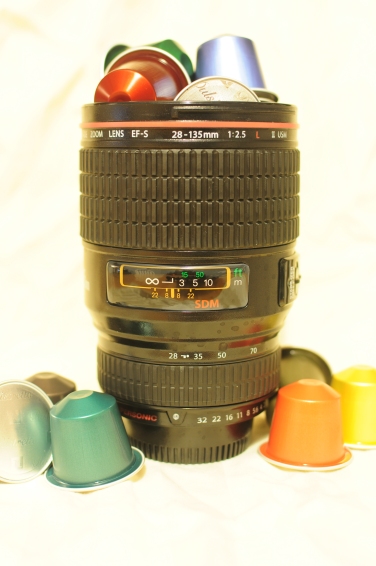
The picture below has a lot of black and white in the image, but it’s in roughly equal amounts, so matrix metering does a pretty good job of finding the correct exposure.

Spot / Partial Metering
Spot or partial metering is pretty much the opposite of matrix metering. Where matrix metering samples the entire scene, spot metering only samples around 1.5% of the image. This spot is usually located in the center of the image, but some cameras allow you to change this to a different auto-focus point. Changing the location of the spot can be quite useful if you do not want your subject in the center of the image. Check your manual for specifics instructions.
This mode can be extremely useful when your background is much lighter or darker than the subject of the image. In the image below, the subject is black and spot metering is pointed right at it, so the image is overexposed.
Center Weighted Metering
Center weighted metering is the middle ground between matrix and spot metering. 60% to 80% of the sensitivity is around the center of the frame with the intensity feathering off towards the edges. This type of metering is best suited for when the central part of the image has little variation, with small bright or dark areas near the edges of the frame.
Even though center weighted metering is based around the center of the image, since it takes into account a wider area than spot, the image is less overexposed.

Average metering
Average metering is most similar to Matrix metering. Matrix metering works by sampling several parts of the image, usually in some pattern specific to the manufacturer and average metering literally takes an average over all parts of the scene and uses that to set the exposure. Unfortunately, this mode is not available on my camera, so I’m not able to give any personal advise on when it should or should not be used.
Exposure Compensation
Even with all the different metering options, your camera will get it wrong. I’ll explain a bit more about this in the technical section, but exposure compensation lets us compensate when the camera gets it wrong. By default exposure compensation is set to 0 EV(Exposure Value), which means that no extra compensation is used. When you change your EV value to +1 EV you’re increasing your exposure by about 1 full stop. If you instead changed the value to -1 EV you would be decreasing the exposure by a full stop. The average EV range is around -2 to +2 in 1/3 increments. This setting can usually be changed quickly by holding down the exposure compensation button and spinning one of the selection dials. As usual, check your manual for specifics. If you’re out shooting and you notice that a picture looks under or over exposed and you’re using an appropriate metering mode, change your exposure compensation setting.
The pictures below are all taken using spot metering. On the left using no exposure compensation, in the middle -1 EV, on the right -2EV.


Technical Details
Welcome to the technical section. Today’s section is probably less technical than most of theses sections are going to be. I don’t really have the space to get deep into this subject in one post, but I think it’s helpful to know a bit about how light meters work and how your camera uses them.
There are basically two kinds of light meters: reflected light and incident light. Reflected light meters are aimed at the subject and measure light that reflects into them. Incident light meters are the opposite, they are held near the subject and point at the camera, measureing how much light is falling on the subject.
Unfortunately incident light meters are the more accurate of the two, but there is no practical way to build one into a camera, so your camera uses a reflected light meter. Since light meters have no comprehension of what you’re trying to shoot they try and force the exposure into a middle point where it’s not too light and not too dark. This works because, most correctly exposed images are 50% grey. What this means is that if you rank the tone of all the pixels in an image on a grey scale from 0 to 1 with white being 1 and black being 0 the average would be around 0.5.
This can completely fall apart when you have too much black or white in an image. White reflects a large amount of light while black only reflects a small amount of light. If you have a large amount of black in your image it skews the image changing it from being 50% grey to some darker amount of grey. This means your camera will try to compensate and overexpose the scene. The reverse is true for too much white in the image, it shifts from 50% grey to some lower amount of grey causing the scene to be under exposed.
End Technical Details
I was recently asked when I would be covering Metering as a topic and luckily it was already next in the queue. This got me thinking, there are probably a lot of topics people would like me to cover / want to know when I will be covering. I’ve created a new page on the blog which lists all of the topics I’ve covered along with an un-ordered list of what I’m planning to cover. This list is not comprehensive and I’ll likely be adding to it over time, and some of these topics might be covered over multiple posts. As readers, let me know if you want me to add something to the list or see if I can cover something sooner.
Peter

When does the metering happen? For instance, when you point and focus (pressing the shutter down half-way), is that when the camera registers the light for the purposes of metering? And if so, can you then change position to focus on a different subject while retaining the same metering for another? For instance, if I meter on a brown cow, will the meter retain the settings if I then shoot a white cow somewhere else in the photo? Or would it be better to do a center-weighted metering for this purpose on the white cow? I ask because I just shot several photos of what i thought was the same subject but the ISO registered higher in some instances making me think that the focus area (metering) was in a different position than what I thought. Sorry if this is confusing, but this is really challenging topic for me. Need help. Thanks!
LikeLike
By default the metering happens at the time you fully press the shutter, but there are a few options you can use to lock metering
Your camera should have an AE-L/AF-L button, you can half press the shutter release then press and hold the AE-L/AF-L button to lock the exposure and autofocus. While the exposure is locked you can recompose the scene with the AE-L/AF-L button still held down. There are usually additional options you can set for the AE-L/AF-L button that make it behave differently. These usually include only locking exposure, only locking focus, locking until button is pressed a second time, or using the button to initiate autofocus.
There should also be an AE Lock option you can set which changes the default so the metering and autofocus lock when you half press the shutter.
You should be able to find where to set these options by looking up the metering section in your cameras manual.
Hope this helps, Peter
LikeLike
I will check it out. Thank you! Totally new info for me. I have a Canon 60D. You shoot Canon too, no?
LikeLike
I primarily shoot Nikon, but at this point Canon and Nikon have pretty much the same features just different names, so those options should still be available for you.
LikeLike
Hi Peter, i enjoyed reading your blogs coz they are very good source of information. You have explained the concepts very well. Thank you so much.
Your shots are really so beautiful.
LikeLike
Thank you.
LikeLiked by 1 person
I look forward to more of your informative posts. Well said.
LikeLike
Thanks!!
LikeLike